Adapting this steek to real life--tricks and tips
 |
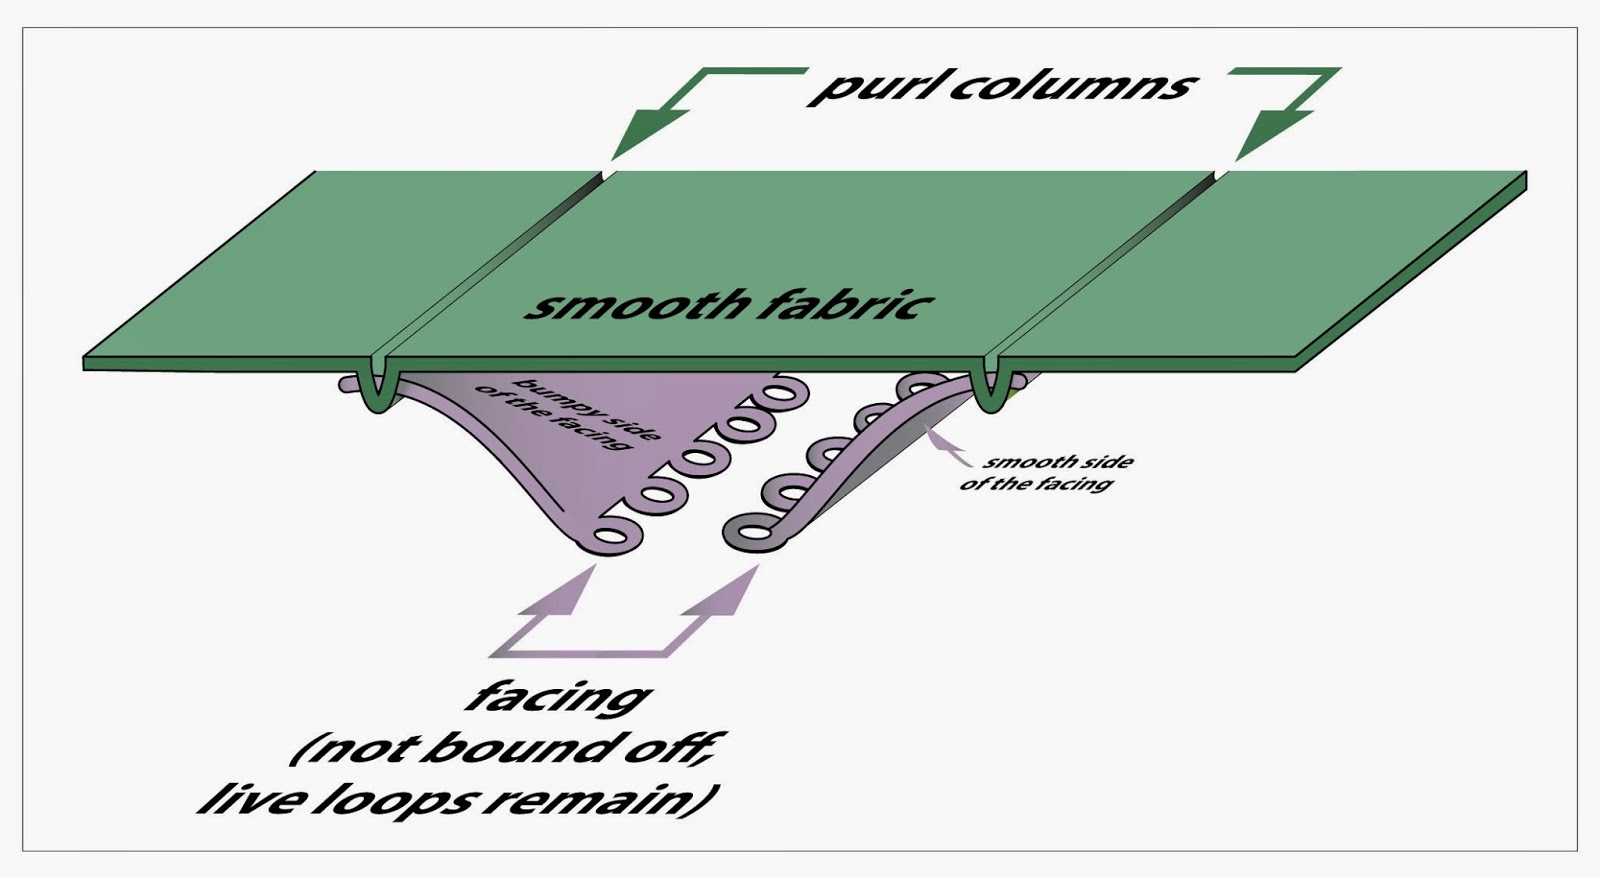
| converting a purl column to be a knit column on the reverse stockinette (purl) face of the fabric |
The facings are anchored into the garment though a purl column (purl as seen from the smooth side of stockinette fabric). To get the tightest possible purl column, initially work the entire fabric in stockinette. Afterwards, locate, then drop (run out) the correct column, making a ladder (ladder shown in dark green).
Next, flip the fabric so you're looking at the reverse stockinette (bumpy) side. With a crochet needle, hook the ladder back up on this reverse side as a knit column (illustrated in darker green). The opposite of a knit column is a purl, so on the front (smooth side) of the fabric, this trick creates a purl column.
This trick of running out a column and hooking it back up from the reverse is called "converting" a column. The purl columns in the samples of the previous post were converted using this trick. Have a look. Just remember to keep a sharp eye that you don't drop the ladder so far that the foundation stitch(es) come loose.
If converting a column on an existing garment, then once you have live loops at the top or bottom of the column to be run out, (more on this below) you can convert the purl column either working bottom-up, or from the neck down, whichever is most convenient. In stockinette, working against the direction of the original work (i.e.: bottom-up in a top-down knit or top-down in a bottom-up knit) amounts only to a half-stitch difference, a difference very nearly undetectable by even the most eagle-eyed.*
ADDING A FACED STEEK to an EXISTING GARMENT
If using this method to add a faced steek to an already-created garment, the first issue is to get live stitches, and the second issue is whether you want the top and bottom bands to cover the steeked front bands (called a "discontinuous front band") or whether you prefer to have the front bands run all the way from top to bottom ("continuous front band"). (Of course, a hybrid front band is also possible--different at the top than the bottom.)
 For a discontinuous front band, remove the existing neck and bottom band, thus exposing live stitches along the garment edge. Next, the purl (anchor) column would be converted from an existing knit column, as discussed above. The front bands (i.e.: the faced steek) would be added next. After the front bands have been added, the bottom and neck bands would be re-knit, picking up stitches right through the bottom and top edges of the steek, thus sealing the steek-tube shut and laying the neck and bottom bands over the front bands. In the illustration to the left, the top- and bottom-band stitches picked up through the facings are indicated by the red lines.
  For a continuous front band, you would steek right through the existing bottom and neck band. Best would be to undo the bind off at both top and bottom bands and put these on holders--this gives you the necessary live loops for the purl column conversion, as well as setting the stage for prettier bind off. Once the original band stitches are on a holder, the next step is to convert the purl column (either from the top or the bottom, makes no difference). After the steek and its facings are completed, the top and the bottom of the steek would be open, as indicated by the red stars on the illustration to the right. To close them, you'd pick up stitches through the ends of the steek--in other words, through both layers of the facing, both top and bottom, then bind off these newly-picked up stitches in one continuous line with the band bind-off. This creates one uniform line of bind-off at bottom and top edge, while at the same time closing the top and bottom of the open steek tube.
 What if your garment is made in a textured pattern? Let's look at the original chart from the previous post (click to enlarge).
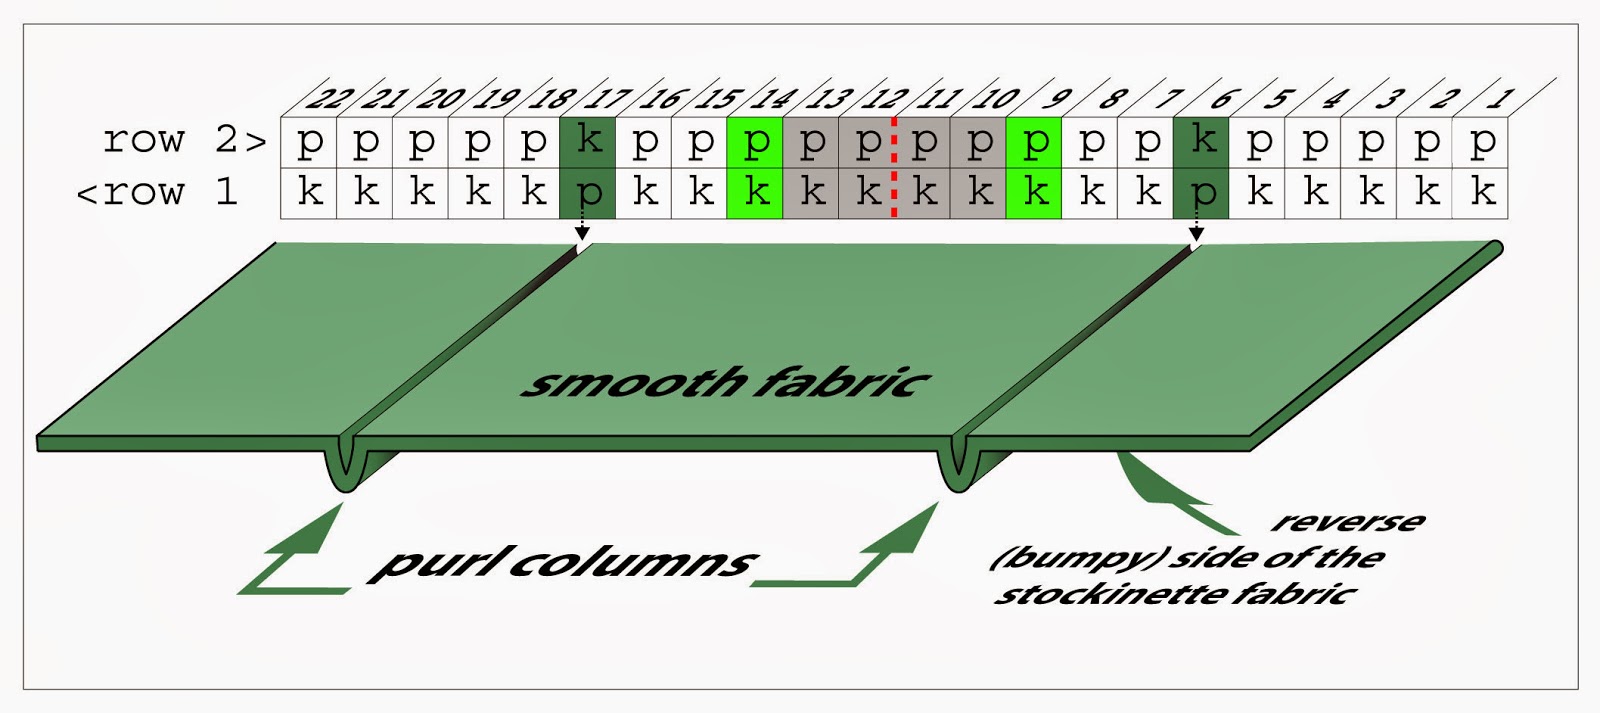
In addition to converting the purl column, you might want to consider converting the columns in your garment which correspond to columns 18 and 5, as well as the 14/15/16 set and the 7/8/9 set. This will yield a smooth front band. It also surrounds the (converted) purl columns (17 and 6) with stockinette fabric, thus assuring that these columns recede into the surrounding stockinette fabric, the better to hide the anchor anchored-in facing stitches. There is no reason to convert the 12/13 columns, nor the 10/11 columns, they will be hidden inside the steek-tube.
WIDTH
In my analysis, this faced steek is the narrowest which will remain structurally stable in use (but again, this is a new trick, so if your experience is different, let me know.) However, there is nothing to stop you from making the outer facing wider. Referring back to the original chart, this would mean adding additional columns between columns 7/8 as well as between 15/16. There is no need to add additional columns between 10/11 and 12/13, two columns to curl under on either side of the cut is sufficient. However, you would need to knit more rows on the inner facing to match the width of the now-wider outer facing.
BUTTONS, BUTTONHOLES and ALTERNATE CLOSURES
If you use faced steeks to make the front bands on a cardigan, you can simply sew buttons on one side, no problem. Buttonholes are a bit more complicated. One option is to consider machine-made buttonholes. Commercially-knit Norwegian-type sweaters often employ this trick. Most sewing machines with a button-hole function can handle knitwear, especially if you use a ball-pointed machine needle meant for knits and loosen up the tension so the feed dogs don't catch the yarn. HOWEVER, TRY THIS ON A SWATCH FIRST (or get an experienced seamstress to do it for you!)
If you use faced steeks to make the front bands on a cardigan, you can simply sew buttons on one side, no problem. Buttonholes are a bit more complicated. One option is to consider machine-made buttonholes. Commercially-knit Norwegian-type sweaters often employ this trick. Most sewing machines with a button-hole function can handle knitwear, especially if you use a ball-pointed machine needle meant for knits and loosen up the tension so the feed dogs don't catch the yarn. HOWEVER, TRY THIS ON A SWATCH FIRST (or get an experienced seamstress to do it for you!)
If you do choose to add machine-made buttonholes, you might like to make the bands wider as discussed above, so that the buttonholes need go through only two layers (the inner and outer facings) thus avoiding the curled ends caught inside. In other words, with a two-column turn-under and a wider band, the cut edges would be located nearer the stabilized edge than the spot where the buttonhole is, so the buttonhole would miss that layer of fabric.
If you want the button look but don't want to use a sewing machine for the buttonholes, all is not lost--if you think about it, the situation of a blind buttonhole band (blind band = buttonhole band with no holes in it) is the same situation as if you had forgotten a buttonhole in an ordinary (non-blind) band and had to add one afterwards. Therefore, have a look at this post, which shows several different ways of adding buttonholes after the fact such as slip-stitch loop buttonholes, or attached I-cord loop buttonholes. The post also shows alternatives to buttonholes such as buttons with snaps underneath--you still get the button look, but no need for button holes.
Yet another option is alternate closures. Here is a post which shows all kinds of alternatives to buttonholes: toggles, clasps, etc. In fact, ornamented pewter or even silver clasps are the traditional method for closing blind-banded sweaters in the northern climes where steeked sweaters are made.
If the look you want is real knit-in buttonholes, there is absolutely nothing to stop you from making the standard narrow facing, then extending the facing PAST the steek and knitting real buttonholes into this extension--see below.
FRONT BAND EXTENSIONS
Suppose, on the grand finale step for making faced steeks, you did not bind off the inner facing loops through the stabilized edge. Suppose, instead, that as you withdrew the waste yarn, stitch by stitch, you pulled one live loop from the inner facing through the corresponding stitch in the stabilized edge as the waste yarn came out. Your result would look like this:
Now you have a series of live loops, and, wow--whenever you have live loops in knitting, these can serve as the taking-off point for all sorts of creativity. In this case, those live loops would make a lovely base for a front band extension. In other words, once you've drawn the live loops of the facing through the stabilized edge, you would then continue knitting the front band on these loops, each row running the entire length of the front band, using the same yarn as you used for the facing. If you used a non-curling stitch like garter stitch, and a one-row buttonhole like the Tulips buttonhole, the below illustration shows the result. Note that in the following series of illustrations, the garment is turned sideways. IRL, these buttonholes would be oriented vertically when the garment is worn.
Suppose, on the grand finale step for making faced steeks, you did not bind off the inner facing loops through the stabilized edge. Suppose, instead, that as you withdrew the waste yarn, stitch by stitch, you pulled one live loop from the inner facing through the corresponding stitch in the stabilized edge as the waste yarn came out. Your result would look like this:
 |
| What the facing stitches look like when pulled through the stabilized edge, including a close-up of the live loops |
 |
| A Tulips buttonhole on a front band extension--note that the extension is bound off in the mc--or it could have been bound off in the cc of the extension |
If you'd like to get very fancy, there's nothing stopping you from knitting a fold-over facing extension, with or without the mc for the fold-line. Into the resulting double-layer buttonhole band, you can make really pretty buttonholes by lining up waste-yarn buttonholes on both fabric faces of the extension, as below.
Remove the waste yarn to get live stitches as below.
If you work the two buttonholes closed together, the final result would be as below.**

Naturally, with front band extensions, you'd want to make the garment fronts narrower to allow for this wider band. Conversely, if your garment had somehow come out too narrow, you could widen it via a front band extension, one on each garment front, which is a heck of a good trick to know.***


Naturally, with front band extensions, you'd want to make the garment fronts narrower to allow for this wider band. Conversely, if your garment had somehow come out too narrow, you could widen it via a front band extension, one on each garment front, which is a heck of a good trick to know.***
ZIPPERS
If you consider inserting a zipper the no-sew TECHknitting way, you'll see that the zipper flange fits very very neatly between the inner and outer facings. It would be best to attach the zipper flange to the inside of the facing first, then cut the steek, then trap when attaching the zipper/facing combo to the stabilized edge. You can use the zipper live-loop method, or the zipper chain-loop method, as explained in the zipper post. For live loops, draw the facing loops through the zipper edge, then continue the 3-in-1-trick as usual. With the chain-loop trick shown at the zipper post, you would draw the final slip stitch of the 3-in-1 steek trick through the chain made on the zipper, rather than through a live loop, inserting the crochet hook sideways--as soon as you go to try this (on a swatch!!) you'll see what I mean.
Tighter spun Norwegian-type long-fiber yarn such as Dalegarn, or thicker premium yarns such as Madelinetosh Vintage Worsted do not compress as successfully, and will become stiff if you try to knit them on smaller needles at the rate of 1:1 (one column of facing fabric to 1 row of garment fabric). If truly at a loss for a color match on these type of yarns, consider needlepoint yarns.
Needlepoint yarns are very long staple pure wools which wear like iron. This yarn is sold in little skeins or in cut lengths--get the skeins. These come in hundreds of colors, making a color match is more likely. Even in skein put-up, needlepoint yarns have very limited yardage, but for a facing, you don't need much yarn--get a couple or three skeins and ask if you can return any unused ones. Plus, being pure wool, needlepoint yarns take very kindly to being felted together (spit-spliced) end-to-end. Further, needlepoint yarns come packaged three strands together. These strands are easy to separate, so you can choose to knit with only two of the stands, or even just one strand, making for a thinner facing as well as greater usable yardage/skein.
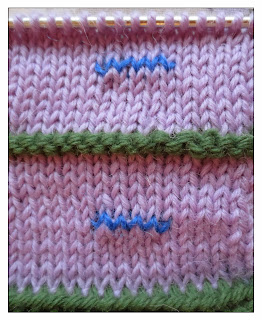
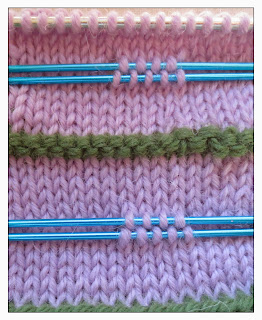
If you want a contrast color (cc) facing, it's easy--choose a thinner yarn in a contrasting color--sock yarns are a good choice, or needlepoint yarns. The purl row through which the facing anchors recedes amazingly, it's almost like a little canyon in the fabric. The cc color anchors at the bottom of this tight little canyon in an almost invisible manner. You'd have to grab the fabric and stretch it to see the cc dots at all. If you absolutely do not want to take any chance of having the cc to show on the garment front, pick up the stitches through the anchor column using the original mc yarn, then switch to the thinner cc in the first row of knitting. For the final step (the three-in-one trick from the previous post) you'd switch back to the he mc yarn.
If you consider inserting a zipper the no-sew TECHknitting way, you'll see that the zipper flange fits very very neatly between the inner and outer facings. It would be best to attach the zipper flange to the inside of the facing first, then cut the steek, then trap when attaching the zipper/facing combo to the stabilized edge. You can use the zipper live-loop method, or the zipper chain-loop method, as explained in the zipper post. For live loops, draw the facing loops through the zipper edge, then continue the 3-in-1-trick as usual. With the chain-loop trick shown at the zipper post, you would draw the final slip stitch of the 3-in-1 steek trick through the chain made on the zipper, rather than through a live loop, inserting the crochet hook sideways--as soon as you go to try this (on a swatch!!) you'll see what I mean.
COLOR and YARN
If you really want a matching-color facing but can't find a matching color in a thinner yarn, one option is to simply use the same yarn (the mc yarn) for the facing, as long as you use the smaller needles--it is surprising how knitting certain wools with a smaller needle successfully compresses them to a smaller gauge. This trick works best on the lofty, soft and fluffy "Germantown" type wool yarns so popular in the US--such yarns as Cascade 220, Patton's Classic Wool, Ella Rae Classic.
If you really want a matching-color facing but can't find a matching color in a thinner yarn, one option is to simply use the same yarn (the mc yarn) for the facing, as long as you use the smaller needles--it is surprising how knitting certain wools with a smaller needle successfully compresses them to a smaller gauge. This trick works best on the lofty, soft and fluffy "Germantown" type wool yarns so popular in the US--such yarns as Cascade 220, Patton's Classic Wool, Ella Rae Classic.
Tighter spun Norwegian-type long-fiber yarn such as Dalegarn, or thicker premium yarns such as Madelinetosh Vintage Worsted do not compress as successfully, and will become stiff if you try to knit them on smaller needles at the rate of 1:1 (one column of facing fabric to 1 row of garment fabric). If truly at a loss for a color match on these type of yarns, consider needlepoint yarns.
Needlepoint yarns are very long staple pure wools which wear like iron. This yarn is sold in little skeins or in cut lengths--get the skeins. These come in hundreds of colors, making a color match is more likely. Even in skein put-up, needlepoint yarns have very limited yardage, but for a facing, you don't need much yarn--get a couple or three skeins and ask if you can return any unused ones. Plus, being pure wool, needlepoint yarns take very kindly to being felted together (spit-spliced) end-to-end. Further, needlepoint yarns come packaged three strands together. These strands are easy to separate, so you can choose to knit with only two of the stands, or even just one strand, making for a thinner facing as well as greater usable yardage/skein.
If you want a contrast color (cc) facing, it's easy--choose a thinner yarn in a contrasting color--sock yarns are a good choice, or needlepoint yarns. The purl row through which the facing anchors recedes amazingly, it's almost like a little canyon in the fabric. The cc color anchors at the bottom of this tight little canyon in an almost invisible manner. You'd have to grab the fabric and stretch it to see the cc dots at all. If you absolutely do not want to take any chance of having the cc to show on the garment front, pick up the stitches through the anchor column using the original mc yarn, then switch to the thinner cc in the first row of knitting. For the final step (the three-in-one trick from the previous post) you'd switch back to the he mc yarn.
...and, the final trick of this post:
A METHOD for IMPROVING the TOP and BOTTOM of the STEEK
The top and bottom of the steek is the area with the most chance for cut ends to show, wear and eventually unravel in a potentially calamitous way. This is because the attachment of the facing and the outer fabric leave a gap at the top and bottom, and therefore provide the least amount of support for the cut ends in these areas.
If you want to put a steek into an already-knit garment, then you will have to resort to needle and thread to sew down the top and bottom right over the edge of the fabric. Then, either sew the bottom of the facing-fabric sandwich closed, or pick up stitches for the bands right through both layers (but not the cut edges) thus knitting the opening shut, as discussed above (continuous bands).
However, if you are knitting a garment with the purpose to steek it later, you can substantially improve the top and bottom of the steek if you are willing to do just a few rows of flat knitting before and after the circular (tube) knitting into which you will cut the steek. These few rows of flat knitting (back and forth) create a little notch at the top and bottom of the steek. Because the sides of this notch are ordinary knit edges (i.e.: not cut-edges) they will not (in fact, they cannot) unravel, and the problem is solved. When you do this trick, you still run the anchor columns all the way to the top and bottom, it's just the top and bottom of the steek itself which is notched.
Until next time, good knitting! --TK
_____
*The main giveaway showing which direction a column of knitting was latched up is the direction the stitches are pointing, a very subtle indicator, indeed.
**These buttonholes were made by simply pulling the live stitches through one another, each through the next, all the way around, then tacking off the last loop. You could also Kitchener-stitch the buttonholes closed, the front one to the back one.
**When making a steeked garment, try the tube on BEFORE you get to the height of the armholes. If it turns out that it is going to be a bit tight, work your design so that the steeks for the armholes are placed in the right location to make the garment BACK wide enough. In other words, the armhole slits will not be situated 180 degrees apart from one another, because the back will be wider than the front. Then, you widen the front by steeking up the front, then adding front band extensions. You can, of course, make the front even wider than the back with this front-band-extension trick. (This is also a good trick for saving any too-narrow pullover you might find yourself knitting, regardless of whether you were originally planning to steek it!)


![[guinea-pig.jpg]](https://blogger.googleusercontent.com/img/b/R29vZ2xl/AVvXsEiFG-GnZkkoIgc0FhZumU0UGPuyD95jr7JKRN1mKKJEl9N-ZZwsSnlNvK6jHogUZT-EolYDK1ti4yd9_t2ADXQbKXlt-kP6J6zltUSlKreqfLGm5FxKT_4-MNXKnmZSPGsjleah/s1600/guinea-pig.jpg)


